Raise the needle-bar to its highest point; loosen the thumbscrew and press it to the left to permit the shank of the NEEDLE to pass up between the clamp and needle-bar as far as it will go, flat side to the RIGHT -- the NEEDLE being flattened on one side so it will set itself perfectly, then fasten securely by tightening thumb-screw.
To avoid loosening of the needle, always use a screw driver to fasten the same, the needle nut being slotted for that purpose.
The needle, when descending, should pass CENTRAL in the needle hole from FRONT TO REAR, but close to the right side of the hole, as it prevents the needle from glancing into the race and being caught by the shuttle.
The MOST IMPORTANT consideration is to buy and use perfect needles -- not bent, nor blunt points. We particularly request our dealers and their customers to buy their needles and oil from us. WHITE F. R. NEEDLES must be used on this machine.
The size of he needle should conform to the size of the thread and both be suitable to the material sewed. Use as fine a needle as will permit the thread to pass freely through the eye.
 TO
REMOVE BOBBIN CASE FROM SHUTTLE
TO
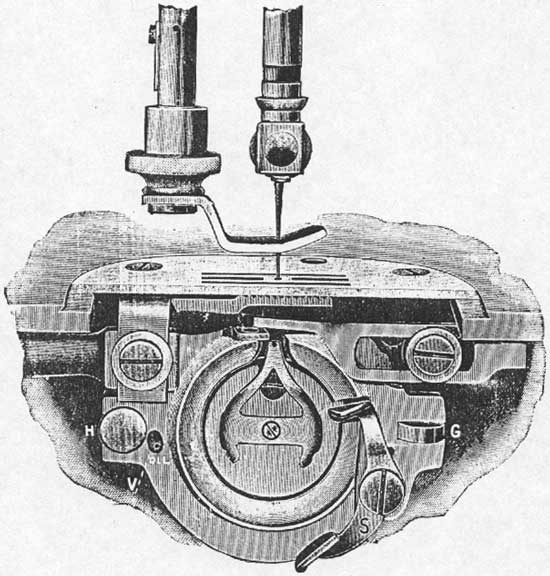
REMOVE BOBBIN CASE FROM SHUTTLERaise the take-up to its highest point. With the thumb and second finger of the left hand clasp bobbin case as shown in cut, then lift latch S with the third finger, when bobbin case may be readily withdrawn from shuttle F. See below
First remove the bobbin case. Turn the machine back on its hinges, then turn the machine in the same direction as in sewing until the point of the needle just enters the needle plate hole; push on rear end of latch G and at the same time pull shuttle race cover away from shuttle and toward latch G from under pin H; the shuttle can now be removed.
When shuttle has been removed from race be sure to clean both, and oil the race slightly before replacing. Occasionally oil slightly in hole on race cap marked V above and pin W in shuttle, see fig 9.
Turn the machine in direction for sewing until the point of the
needle just enters the needle plate hole; take the shuttle by the center pin
W with the left hand and place it in the race, so that point of shuttle will
be from you and  over
arrow on thread cast of, so that the holes in the shuttle will drop on to driving
pins in race, then replace the shuttle race cover.
over
arrow on thread cast of, so that the holes in the shuttle will drop on to driving
pins in race, then replace the shuttle race cover.
DO NOT FORCE the shuttle into race. It will enter readily when in proper position.
Should the machine at any time time act badly in sewing or running it would be well to remove shuttle and clean it and the race, which is but a moment's work.
To replace the bobbin case, it need not be held as when removing, but simply slip it on the pin in shuttle, with the tension projecting upward, and push it into shuttle as far as it will go, when the spring latch will pass over and retain it in that position.
The thread should be allowed to project about one inch from bobbin case tension.
 Place
spool on spool pin, pass the thread down through the rear hole in arm of cover
plate, then to the left under and over the arm down through front hole. Put
the end of thread through hole U in bobbin from
inside out, place bobbin on bobbin wider spindle, raise winder so belt will
drive it, loosen thumb screw in hand wheel, run the machine as in sewing, holding
on to the end of thread until winding is started, then break off thread and
finish winding.
Place
spool on spool pin, pass the thread down through the rear hole in arm of cover
plate, then to the left under and over the arm down through front hole. Put
the end of thread through hole U in bobbin from
inside out, place bobbin on bobbin wider spindle, raise winder so belt will
drive it, loosen thumb screw in hand wheel, run the machine as in sewing, holding
on to the end of thread until winding is started, then break off thread and
finish winding.
Fig. 8 represents the bobbin case. To regulate the lower tension, turn the screw T to the right to tighten, and to the left to loosen the same.
Place bobbin in case so that thread will come from bobbin on same side as hole B in bobbin case; pass thread through slot A to hole B thence across opening, drawing it under lip C then pull it up until thread passes out under tension spring D.
The tension on bobbin case should be the same as the upper tension.

Place the spool on spool pin, take the thread in your left hand
holding it taut with the right during the whole  threading
operation. Pass thread from spool over check spring K at top of face and down
under point L.
threading
operation. Pass thread from spool over check spring K at top of face and down
under point L.
Now pull thread upward until it passes through the eye of spring N and into notch O, then into end of take-up P then down through slot R in end of needle bar and through eye of needle from left to right, allowing about 3 inches of thread when take-up is at its highest point.
To draw up the lower thread, raise the presser-foot, take hold of end of upper thread and turn the hand wheel once round, (moving upper side of wheel from you), which will draw the lower thread up through needle hole.
Pass the ends of both threads under the presser-foot and you will be ready to sew.
Note, -- Do not run the machine with the presser-foot down on the feed without cloth under it. Do not pull cloth to or from you in such a manner as to bend the needle.
The illustration above represents the Tension Regulator and Indicator for the upper thread, an entirely new and useful device.
The half circle is marked with a scale running from 1 to 8, with the word "loose" at Number 1 and "tight" at Number 8 , Number 1 being the slack and Number 8 the tightest tension.
The regulator is located at the right end of the machine on the front side or arm.
TO SHORTEN stitch move lever down.
TO LENGTHEN stitch move lever up. Number 1 indicates the shortest, and Number 7 the longest stitch
To loosen the tension, turn the thumbscrew on the dial to the left which will move the pointer towards No. 1. To tighten it, turn to the right, moving the pointer towards No. 8.
By this means the same tension can always be duplicated, thus obviating the necessity of experimental trials, as is the case with other machines. If a tight tension is desired, both upper and under threads must necessarily be tight.
If the upper thread is tight and the lower thread loose, the upper thread will be drawn to the top thus:
If the lower thread is too tight, it will be drawn straight on the bottom of the goods, thus:
When you desire the goods to look alike on both sides, and be elastic, balance the tension thus:
The tension releaser is operated by the presser-bar lifter. By means of it, all tension is taken off the upper thread when the presser-foot is raised, and the work can be taken out without pulling the thread down by hand.
***PARTICULAR NOTICE --- The tension cannot be regulated when the lift is up because the Releaser is operated by the presser-bar lifter.
In threading the needle and bobbin case respectively, you should leave an end about two inches in length to each. Hold the end of the upper thread loosely in the left hand, and with the right hand gently revolve the hand-wheel until the needle passes to its lowest point and returns, a loop will be formed through which the shuttle will pass, and, as the needle ascends it will draw up the lower or shuttle thread, and the machine is ready for practical operation.
Stop the machine with the take-up at its highest point; raise the presser-foot with the lifter which slackens the upper thread; then take hold of your work with your left hand and pull it directly from you, keeping the top thread in the slot of the presser-foot, which will prevent bending the needle.
Now raise the work and draw the threads into the thread cutter on the presser-bar and pull downward, which will cut the threads the proper length to commence work again.
If the upper thread breaks, it may be caused by the needle not being properly set, or the machine not threaded correctly, or the upper tension too tight, or the thread uneven and the needle too small for it, or the needle eye too sharp, or the presser-foot attached to the machine so that the needle rubs it in passing.
If the under thread breaks, it may be caused by the bobbin case being improperly threaded, or too much tension upon it, or by the bobbin being wound too full so that the thread slips over the ends of the bobbin in the bobbin case.
If the needle breaks, it is more than likely your own fault, caused by pulling the goods to or from you in such a manner that the needle strikes the throat plate and is bound to break. The needle may however, break in trying to sew extraordinary heavy seams when the pressure on the presser-foot is not heavy enough. To create more pressure upon the goods turn the presser-bar nut on top of the presser-bar to the right; to decrease the pressure turn it to the left.
If the machine makes loop stitches, it is most sure to be caused by too loose tension both top and bottom.
If the machine skips stitches, the needle is either bent or not in the right position.
If the stitches are not even, it may be caused by the presser-foot not resting evenly upon the fabric sewed, or by the feed not being high enough, or by the stitch being too short, or by pulling the cloth, or by using too fine a needle with too coarse or uneven thread.
If the machine should be run without sewing and thread get in the shuttle race making the machine run heavy, take out the bobbin case and run the machine in the wrong direction; it will cut the thread out.
NOTICE --- The leather band should always be tight enough not to slip. If it slips, or does not force the needle through thick goods, cut off a very short piece and re-adjust the ends. The belt should not be so tight as to prevent and easy motion of the machine.